If you’re an iPhone user, then you should be familiar with iTunes. It is the best place to organize and enjoy all of your music, movies, TV shows on your Mac and Windows PC. You can also plug your iPhone into computer and use iTunes for sync, backup, restore, music or video transfer, etc. iTunes really brings many conveniences to people’s lives, but also causes many troubles, such as iTunes won’t open, iTunes backup corrupt or not compatible, iTunes not recognizing iPhone, and more.
Most of the time, iTunes on computer and iPhone can be connected well via USB cable. However, still some iOS users complained that their iPhone not appearing in iTunes, especially after updating to iOS 13. Actually, there are many different reasons why an iPhone not detecting in iTunes, even though the computer can detect the device well. In our previous post, we’ve discussed how to fix iPhone not showing up on PC. And today, we will focus on how to fix iPhone not showing up in iTunes on Mac or Windows 10/8/7.
Below are several simple tips you can try when you connect your iPhone to computer with a USB cable and iTunes doesn’t recognize your iPhone or you’re getting a cryptic “0Xe” error. These solutions can be applied to all iPhone models, including iPhone 11, iPhone 11 Pro, iPhone 11 Pro Max, iPhone XR/XS/XS Max, iPhone X/8/7/6s/6, iPad Pro, etc.
- Tip 1. Check USB Cable and USB Port
- Tip 2. Restart Your iPhone and Computer
- Tip 3. Update iTunes to the Latest Version
- Tip 4. Disable Restrictions on Your iPhone
- Tip 5. Reset Location and Privacy Settings
- Tip 6. Check System Report on Your Mac
- Tip 7. Reinstall Apple Mobile Device USB Driver on PC
- Tip 8. Uninstall and Reinstall iTunes
- Bonus: Restore iPhone Data without iTunes
Tip 1. Check USB Cable and USB Port
One of the most common reasons why your iPhone not detecting in iTunes is due to bad connectivity. You should first check your USB cable and ensure it is in good condition. If possible, try using a different USB cable to see if your iPhone will be recognized by your iTunes. And we suggest you use a genuine Apple USB cable instead of USB cables made by other companies.
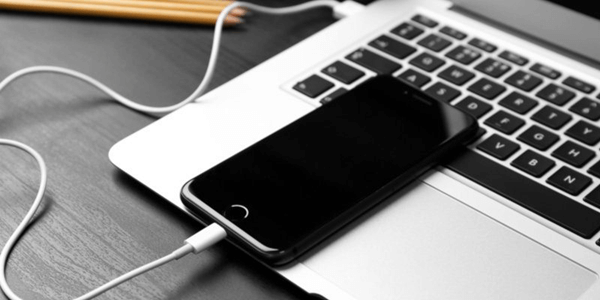
Also, you should check your iPhone’s port as well as the USB port on your computer. Try cleaning your iPhone’s port using a toothbrush, and reconnect your iPhone to another port from your computer or even another computer if you have one. Meanwhile, try unplugging all other USB devices from the computer to avoid interruption.
Tip 2. Restart Your iPhone and Computer
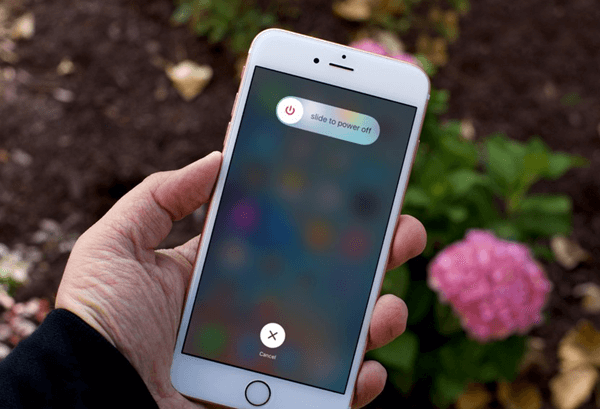
iTunes not seeing iPhone problems are often caused by small software glitches on your iOS device. You can restart your iPhone by pressing and holding the Top or Side button until the power off slider appears. For newest devices like iPhone X/XR/XS Max, you should press and hold the Side button either the volume button. Also, you can try restarting your Mac and Windows computer. After that, connecting your iPhone to your computer again and see if your iPhone is showing up on iTunes.
Tip 3. Update iTunes to the Latest Version
You may experience iTunes not recognizing problem if you connected to an old version of iTunes on your PC or Mac. You can easily resolve this error by updating your iTunes to the latest version.
On a Mac: Go to Apple menu > select System Preferences > click Software Update to check for macOS system updates. Then click “More info” to select iTunes updates and install it on your Mac.
On a Windows PC:
- For iTunes downloaded from the Apple website, open iTunes > select Help in the menu bar > click Check for Updates and follow the prompts to install the latest version of iTunes;
- For iTunes downloaded from the Microsoft Store, open the Microsoft Store app > click the menu button > select Downloads and updates > choose Get updates and check for iTunes updates.
Tip 4. Disable Restrictions on Your iPhone
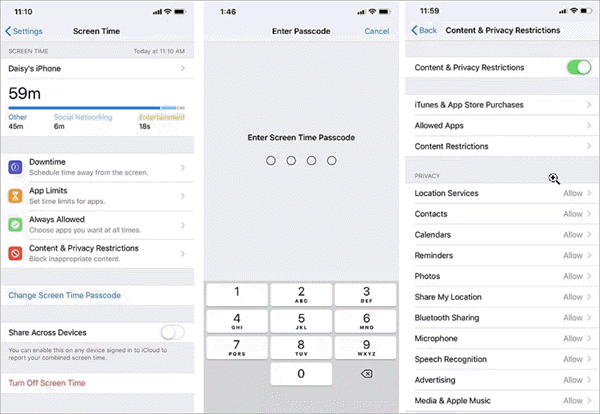
If restrictions is enabled on your iPhone, you may encounter the problem of iTunes not detecting iPhone. You can disable restrictions on your iPhone by heading to Settings > Screen Time > Content & Privacy Restrictions, enter your passcode and tap the switch to Turn Off. After disabling restrictions, reconnect your iPhone to the computer and open iTunes, then check if it is correctly recognize the device. Meanwhile, you should ensure your iPhone is unlocked and on the Home screen.
Tip 5. Reset Location and Privacy Settings
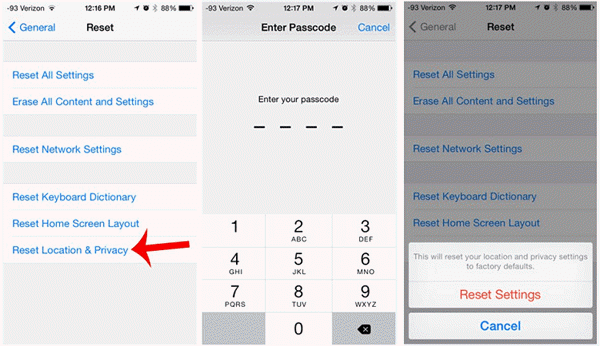
Tap “Trust this computer” if you are connecting your iPhone to the computer for the first time. If you accidentally tap the “Don’t Trust” button, then your iPhone will not showing in iTunes. Don’t worry. There is a quick fix. On your iPhone, go to Settings > General > Reset > Reset Location & Privacy. Then reconnect your iPhone to the computer, you’ll see the prompt of Trust This Computer appears again. This time, make sure to tap “Trust”.
Tip 6. Check System Report on Your Mac
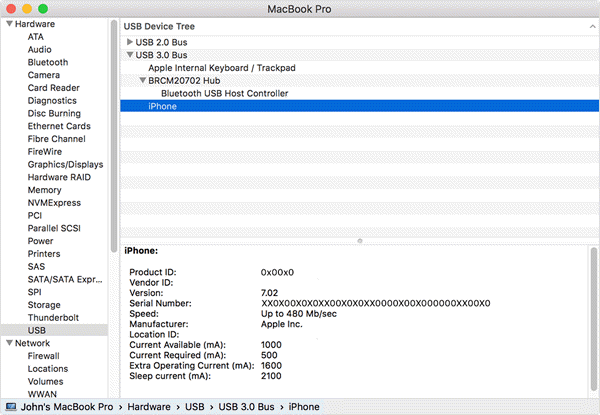
If you’re a Mac user, you should check your System Report with your iPhone connected to the computer. If you see your iPhone displayed, but iTunes still doesn’t recognize the device, the issue is probably with the software. Then you can try uninstalling third-party security software on your computer to fix the issue.
Here’s how to check System Report and uninstall security software on Mac:
- On your Mac, hold down the Option key and click on the Apple menu, then choose System Information or System Report.
- Select USB from the list displayed on the left, and see if you can see your iPhone under the USB Device Tree.
- Now try to uninstall any third-party security software from your Mac computer, such as antivirus or anti-malware apps.
Tip 7. Reinstall Apple Mobile Device USB Driver on PC
If you’re a PC user and your iPhone is not showing up in iTunes on Windows, you can try to re-install Apple Mobile Device USB Driver. This driver is specifically for PC users and tells the computer what to do with Apple devices. iTunes won’t detect your iPhone correctly if it malfunctions. Here’s how to re-install it:
If you downloaded iTunes via Apple website
- Disconnect your iPhone from computer, unlock the device and make sure it is on the Home screen. Then reconnect your iPhone and close iTunes if it opens.
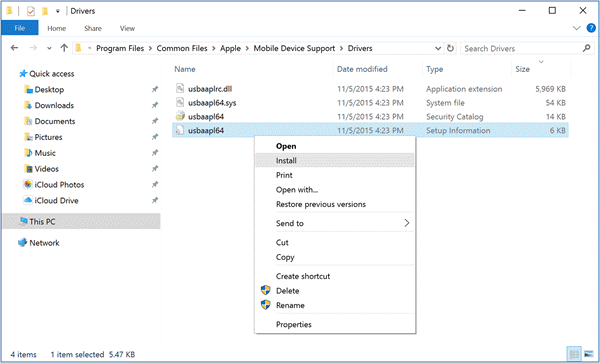
- Press the Windows and R keys to open the Run command, enter %ProgramFiles%\Common Files\Apple\Mobile Device Support\Drivers and click OK.
- Right-click on either usbaap164.inf or usbaapl.inf and select Install.
- When the installation is complete, disconnect your iPhone and restart your computer. Then reconnect your iPhone and open iTunes.
If you downloaded iTunes via Microsoft Store
- Disconnect your iPhone from computer and unlock it, then go to the Home screen. Reconnect the phone and close iTunes if it launches automatically.
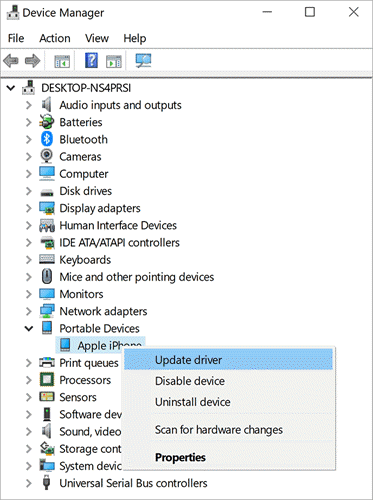
- Right-click the Start button and choose Device Manager, then locate and expand the Portable Devices section.
- Look for your connected Apple iPhone, right-click on the device name and choose Update driver. Then select “Search automatically for updated driver software”.
- After the software installs, try opening iTunes and see if it recognize your iPhone.
Tip 8. Uninstall and Reinstall iTunes
If you’ve followed all of the above solutions and your iTunes still not recognizing iPhone, it is possible that the iTunes app on your computer gets corrupted. You can try completely uninstalling iTunes from your computer, then re-install iTunes. Uninstalling iTunes won’t delete your music, videos and other contents, but we still recommend you make an iTunes backup before you doing this.
Bonus: Restore iPhone Data without iTunes
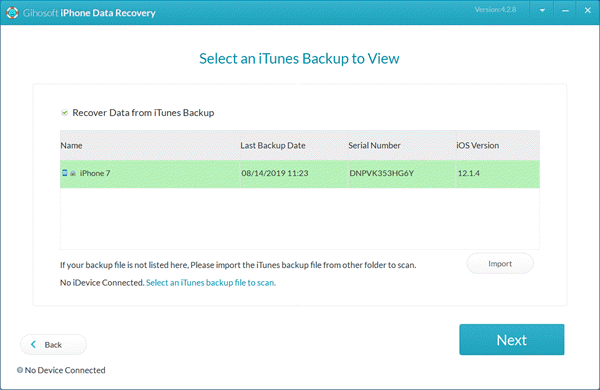
If you experience iTunes not recognizing iPhone problem when you try to use iTunes to restore data, don’t worry, there is an alternative way to do this job. We recommend you use Gihosoft Free iPhone Data Recovery to restore iPhone data without using iTunes. It can detects all iTunes backups on your computer and lets you extract photos, videos, contacts, messages, WhatsApp, notes, voice memos, Safari history and more from iTunes backup onto your computer.
Here’s how to extract and recover data from iTunes backup:
- Download, install and run this free iPhone backup extractor on your computer. Then select the data you’d like to extract and click on “Next”.
- All iTunes backup files on your computer will be displayed. Choose the one that contains your lost data and click on “Next” to start scanning.
- Preview the contents found in the iTunes backup and choose those you need, then click “Recover” to export these data to your computer.
